Convey the complexity of our brains:
There are 100 billion (11 zeros) neurons (wires) in our brain. (They are each 100th of a mm wide and between a mm and a metre long.)
Each of those neurons make about 10 thousand connections with other neurons - both through our senses and from places in the brain that summarize many inputs.
There is A LOT of computation - so much that we are even concious of what we are doing
Show students a model of a brain (see photo) or a diagram of a human brain in the skull.
e.g. https://upload.wikimedia.org/wikipedia/commons/8/86/Brain_Anatomy_%28Sa…
Parts of it are for receiving messages from our environment - seeing and tasting and touching. A lot of our brain is for reasoning and critical thinking. We humans are really good at figuring stuff out.
Our brain is protected by the skull.
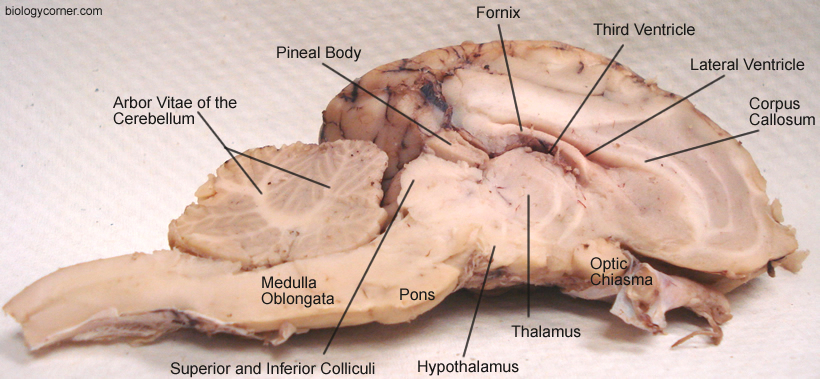
Show image of lamb/pig head with brain in (students may be able to guess what animal by the other features of the head).
Their brain is relatively small compared to ours, but the parts are the same.
If available, show real lamb/pig brain - just look to start. Or show images of the brain separated.
It looks like one bug mush, but there are distinct parts that do distinct things.
The red is blood, which brings oxygen to the brain cells. The pink is the cell bodies of the neurons (which make chemical signals). The long parts of the neurons (the axons), where the electrical signals jump along very fast, look white when they are packed together.
The brain looks wrinkly as it is a sheet folded up.
Demonstrate how the brain is packed:
The brain is flat (show a sheet of paper), but your head is round (show a tub).
If it packs like this, it fits: crumple up the paper, and put it into the plastic tub.
The brain has very distinct parts. Show diagram of brain regions.
e.g. first image in https://kaiserscience.wordpress.com/biology-the-living-environment/phys…
Cerebellum and fine motor control
Point out cerebellum in the real or model brain or on the diagram. It controls fine movement.
With straight arms, slowly move your arms up and make your finger tips meet over your head.
You can make them touch without seeing them. Your cerebellum does this. (The big movements are made by another part of the brain, but the fine tuning is your cerebellum.) A person with a damaged cerebelllum cannot accurately make their fingers meet - their arms will move around a lot as they try and reach their target.
Now try it in front of you, so you can see your fingers meeting - it is a lot easier because you are now also getting input from the sensory part of your cortex, with messages from your eyes.
Hindbrain and breathing
Look at medulla oblongata (hindbrain) on lamb brain.
We will use our medulla oblongata/hindbrain: ask the students to follow what you do - jumping, running on the spot, jumping jacks etc for at least 2 mins. Then ask them to sit down and think about what their body is doing. Their heart is beating fast and they are breathing harder. They did not have to think about doing those things - their body just did it. The medulla oblongata reads the levels of CO2 in the blood, by measuring the pH of the blood.
Do the CO2 making water more acidic activity to show how CO2 changes the pH. When the pH of the blood falls, as it does when we excercise and increase the amount of CO2 in the blood, the medulla oblongata signals to speed up breathing and heart rate which will increase O2 levels in the blood again.
Cortex
The wrinkly part is the cortex. It is the largest part of the brain. The wrinkles mean you can pack more surface area into the same space.
It has very distinct parts - show image of cortex regions.
Frontal lobe is for thinking, emotion, reasoning, memory. Other parts are for moving and sensing our environment - seeing, hearing, tasting, touching.
Compare the size of our cortex to other animals (look at diagrams of brains from different animals). Every animal has hind brain parts. Only mammals have a large cortex. Ours is especially large relative to the rest of our brain - we do a lot of reasoning. However our optic and olfactory areas are relatively small.
Motor cortex and touch test:
We’ll experiment with the neurons coming into the touch part of the cortex.
Touch test activity.
Now we will show a circuit of neurons at work, with another part of the brain the thalamus, involved:
Reaction time activity.
Eyes to visual cortex to thalamus to motor cortex through spinal cord to hand.
(The thalamus also regulates conciousness, sleep and alertness.)
(The Corpus callosum, arching above the thalamus, joins the halves of the brain.)
Touch the real brain (if available)
(Students that don't want to touch the brain can feel it through saran wrap.)
Feel the brain and discuss texture compared to meat - squishy, tacky etc.
The students' own brains feel like this!
Cut brain to see white and pink parts. White is (myelin of) axons, pink is cell bodies. Electrical signals jump along the axons - very fast. Cell bodies make chemicals and axons send the messages. Show an image of a neuron, with cell body and axon.
Wash well with soap and water.