ingridscience
Fossil collection
Summary
Look at fossils
Materials
- any available fossils
Procedure
Look at the fossils, and allow students to carefully handle them.
Ask if they look like anything they recognize.
Tell them how old the fossil is, so how long ago the animal or plant was alive, before it was turned into fossil.
My ammonite piece gives a sense of how large ammonites could be.
My limestone piece shows how sedimentary rock is clearly made from layers and layers of shelled animals.
Notes
The limestone piece was used as part of a lesson on how shells become sedimentary rock.
Grades taught
Gr 2
Gr 3
Gr 4
Gr 5
Gr 6
Weathering
Summary
Weather rocks in a rock tumbler and go on a weathering scavenger hunt.
Procedure
As part of the rock cycle, rocks come to the surface, where they are exposed to the weather and other agents which break them into smaller pieces. This breaking up is called 'weathering'.
Weathering happens in many ways:
The sun heats rocks up and makes them crack. Water freezes inside cracks and makes them wider. Rain and wind wear little bits off. Living things grow in rocks and break them up. Rocks bump into each other which breaks them and wears them down.
Set up the rock tumbler with a variety of hard and soft rocks inside, to show what happens when rocks bump together.
While the rocks are tumbling (for about an hour), go on a weathering scavenger hunt.
Check inside the tumbler after about an hour, to find that the soft rocks have already worn away or broken up a bit.
Leave the tumbler for another week.
The soft (sedimentary) rocks might disappear completely, becoming mud, while the hard (igneous and metamorphic) rocks are only smoothed a little at the edges.
(Make sure that the tumbler turns all the while - as some of the rocks become mud, the tumbler might stop turning, and need a little more water adding.)
The rock tumbler mimics rocks colliding into each other, and are weathered into smaller, rounder rocks, and sand.
Weathering as part of the carbon cycle:
Weathering can either remove or add carbon dioxide to the atmosphere.
If organic matter in rock is exposed to the air, their carbon is converted to carbon dioxide, which becomes part of the atmospheric CO2.
Atmospheric carbon dioxide can chemically break down rocks and then becomes trapped in rock sediment.
Notes
This lesson used as Lesson 5 of 6 of a series on the Carbon Cycle.
Good image of the whole carbon cycle at https://www.britannica.com/science/carbon-cycle
For a lesson on Weathering and Erosion, follow with an Erosion activity.
Grades taught
Gr 5
Gr 6
Weathering scavenger hunt
Summary
Go outside and look for signs of weathering.
Materials
- school grounds to explore
- weathering worksheets (laminated, for protection and reuse) - see attachment
- dry erase markers
Procedure
This activity adapted from: https://docs.google.com/document/d/1cK6W5Mn2t0RMSmxnQcoTmP0tHDTks5vv-Pa…
Before class, print (and optionally laminate) worksheets. They are best printed on both sides and then cut, so each worksheet is half sheet double-sided.
Discuss with students how they can spot signs of weathering:
Things that are not alive and that have changed since they were made. They might have broken into smaller pieces, chipped, cracked, faded, rusted, or become a plant or animal's home.
Distribute weathering worksheets (and dry erase markers if the sheets are laminated, or pencils if not).
Groups of students can share a worksheet and find Signs of Weathering together.
They can check off each Sign of Weathering as they find it.
Once students have found all signs of weathering, gather as a group in a large circle to discuss the Agents of Weathering.
Flip over the worksheet and ask students to try and match one or more Agent(s) of Weathering with each Sign of Weathering.
Notes
Grades taught
Gr 2
Gr 3
Gr 5
Gr 6
Rock tumbler
Summary
Use a rock tumbler to show weathering as the rocks collide with each other.
Materials
- rock tumbler
- rocks to tumble - for a weathering activity add a variety of soft and hard rocks
Procedure
Choose a variety of rocks to add to the tumbler: hard igneous or metamorphic rocks (we chose basalt and granite, both igneous), as well as some softer sedimentary rocks (we chose sandstone and shale).
Lay the rocks on a sheet of blank paper and draw around them to show their original outlines: their size and shape. Label the shapes with the rock types.
Add the rocks to the tumbler, to fill it at least half full. Add some quartz hammer stones if more rocks are needed to fill up the tumbler.
Add a cup of water. Seal the tumbler barrel and start the tumbler.
Leave tumbling for an hour, then take out the rocks. Rinse them off if necessary and lay them on the paper of outlines to see how they have changed.
Some of the softer rocks (e.g. our mudstone) will already have started falling apart, and maybe even making mud. The harder rocks may be starting to smooth out on their jagged edges.
Run the tumbler for longer, a few days or a week, and then compare the rocks to their outlines again.
(If necessary, the tumbler may need some more water during this week, as some of the rocks turn to mud.)
The softer sedimentary rocks may have completely turned to mud after a few days - they have weathered away completely.
The harder rocks will still be close to their original size, but will be smoother.
This is the process of weathering - as rocks bump together, little bits get knocked off and the rocks are worn away.
The speed of weathering depends on how hard the rock is. Igneous and metamorphic rocks are much harder and more resistant to weathering than sedimentary rocks.
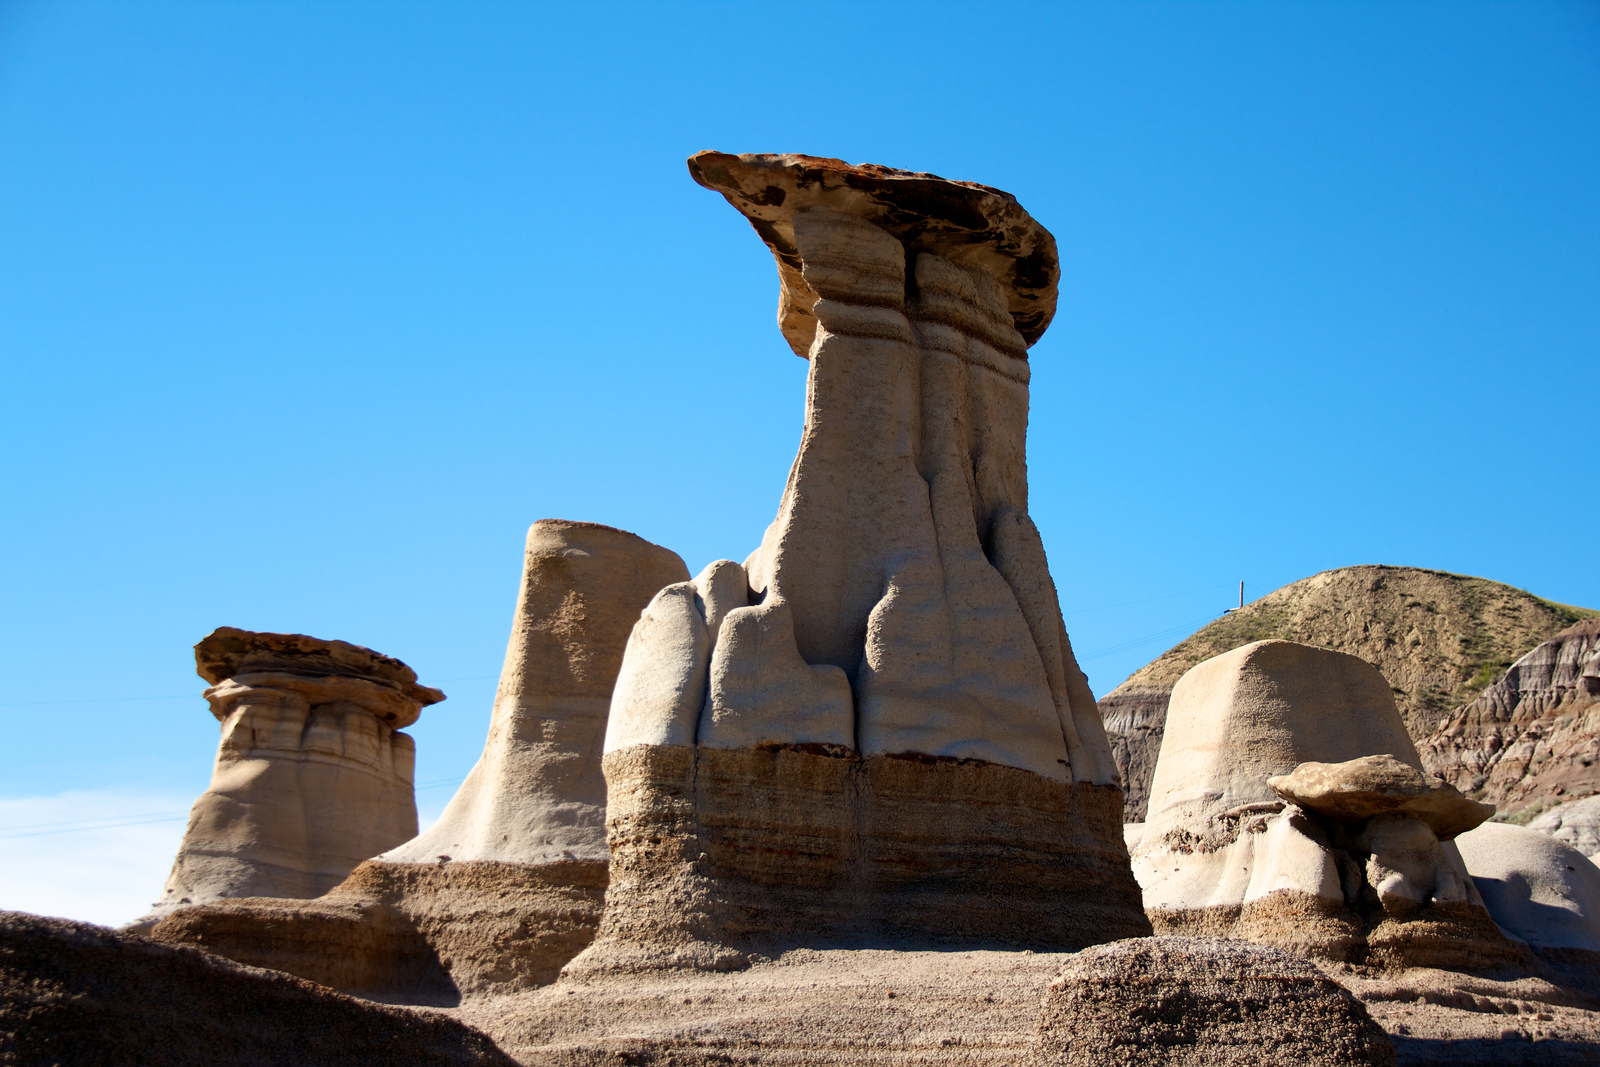
Some natural landscapes are fantastic shapes due to the uneven weathering of different kinds of rock. e.g. Hoodoos in Alberta. See this link: https://upload.wikimedia.org/wikipedia/commons/9/9e/Close_up_of_the_Hoo…
Notes
Grades taught
Gr 2
Gr 3
Gr 4
Gr 5
Gr 6
Carbonate acid test
Summary
Drop different rocks or minerals into vinegar - carbonate rocks will bubble. Sea shells are made of carbonate and also bubble.
Materials
- ice cube trays (darker colour shows bubbles best)
- shell pieces e.g. oyster or clam shells from a beach
- pieces of calcite, limestone, marble (carbonate rocks)
- pieces of quartz, quartzite (or other non-carbonate rocks; test first as some carbonate is present in many rocks)
- vinegar in squeeze bottles
- flashlights to view bubbles more easily
- optional worksheet (attached)
Procedure
Carbon in the ocean is assimilated into animal shells and rocks.
A test for a carbonate-containing shell or rock is the 'acid test'. When a shell or carbonate rock is dropped in vinegar (or other acid), the shell or rock bubbles.
Using an ice cube tray to keep tests separate, students can test for carbonate.
First add vinegar to a beach shell, and see bubbles streaming off the shell, as it reacts with the acid. These bubbles are from the carbonate in the shell as it chemically reacts with the acid, to make carbon dioxide gas.
A flashlight helps to see the tiny bubbles.
Students can then be given different kinds of minerals or rocks, some carbonates and some other rock families, to try the acid test on each, and group them into their families (carbonate and other). Use the optional worksheet (attached below).
We used carbonate rocks (calcite, limestone and marble) and silica rocks (quartz and quartzite).
Note that many rocks contain little seams of calcite (which bubbles), so to find a rock that does not bubble at all these must be absent. Test rocks first. For non-carbonates, we used quartz (easy to find in rock shops) and quartzite (harder to find).
Notes
Original worksheet with Uu
Updated worksheet with Shaughnessy
Grades taught
Gr 5
Gr 6
Carbon into shells and rocks
Summary
Show how carbon dioxide in the ocean is incorporated into animal shells and some rocks.
Procedure
The CO2 in the ocean becomes part of the shells of ocean animals, and is also made into rock.
Show the chemistry of carbonate precipitation into calcium carbonate.
Calcium carbonate, from dead shelled animals or from chemical precipitation, is the starting point for many 'carbonate' rocks, as they enter the rock cycle.
If available, show a rock that is made up of shells (e.g. limestone), or show images from a "limestone shells" google search.
These shells from dead animals that drop to the ocean floor are buried in layers and layers until they are compressed into sedimentary rock. (If available show sedimentary rock that is clearly layers of shells.)
The carbonate chemistry remains the same as rocks move from sedimentary to metamorphic to igneous rock. The mineral is the same.
Other rock families have their own mineral chemistry.
Test for carbonate rocks, to identify which rocks of a collection are carbonate rocks.
Notes
Lesson 3 of 6 of a series on the Carbon Cycle.
Good image of the whole carbon cycle at https://www.britannica.com/science/carbon-cycle
Grades taught
Gr 5
Gr 6
Carbon exchange between air and water
Summary
Use pH indicator to show that carbon dioxide dissolves in water, and model the chemistry. Test different water sources.
Procedure
Carbon in the air cycles with living things (see lesson on carbon exchange between living things and the air).
Carbon dioxide in the air also cycles into water and our oceans.
These are both fast carbon cycles.
Activity showing how CO2 dissolves in water to make it more acidic.
Optionally, Model the chemistry of CO2 combining with water to make carbonic acid (first part of carbonate precipitation activity).
Test other kinds of water (e.g. fish tank, pond, ocean) to see how acidic they are.
(Note: they will not necessarily get their acidity from dissolved carbon dioxide, but maybe from other water chemistry.)
Notes
Lesson 2 of 6 of a series on the Carbon Cycle.
Good image of the whole carbon cycle at https://www.britannica.com/science/carbon-cycle
Grades taught
Gr 2
Gr 3
Gr 5
Gr 6
Carbon exchange between living things and the air
Summary
Use real animals and plants, and molecule models, to show how living things exchange carbon with the atmosphere.
Materials
Materials in the activities
Procedure
Introduction to Carbon cycle lesson series for older grades:
The carbon cycle circulates carbon between animals, plants, the air, soil and rocks.
Introduction to Carbon cycle lesson series for younger grades:
Chemistry is one way that Earth's living things, its water, air and rocks are connected.
This lesson focuses on how animals and plants are connected to the air.
Do a worm observation, then put the worms in a classroom worm bin.
Worms, just like us, need air, and the oxygen in it. as well as food, for energy.
Use molecular models to show how the worms use food and oxygen (called respiration).
Plants do the opposite to us animals. They take carbon dioxide from the air and make food and oxygen with it (called photosynthesis).
Plant bean seeds in a jar, which will use carbon dioxide in the har, and the sun's energy, to make sugar and build a plant.
Leave the jar closed and keep in the classroom for a week.
Optionally show the opposite chemical reaction (photosynthesis) combining CO2 and water to make sugar.
Notes
Lesson 1 of 6 of a series on the Carbon Cycle.
Good image of the whole carbon cycle at https://www.britannica.com/science/carbon-cycle
Grades taught
Gr 2
Gr 3
Gr 5
Gr 6
Molecular modelling of respiration and photosynthesis
Summary
Use molecule models to show how living things use sugar and oxygen for energy, and how plant photosynthesis reverses the process.
Materials
- molecule models (see resource) to build one glucose (C6H12O6) and six oxygen molecules (6 X O2), as many sets as possible for student groups to each have a set
Procedure
This models how animals combining oxygen (from the air) with sugar (that they eat), to give them energy. The chemical reaction generates carbon dioxide and water. So animals (and plants also), when they respire, put carbon dioxide into the air.
Plants, when they photosynthesize, do the opposite: they take carbon dioxide from the air, and combine it with water to make sugar (which they use to build their structures) and oxygen. Hence, planting trees helps pull carbon from the atmosphere.
Give student groups a set of molecules (one sugar and 6 oxygens).
Ask them to take apart the sugar molecule and combine it with the oxygens to make 6 water molecules (tell them H2O) and 6 identical other molecules.
Students will eventually arrive at carbon dioxide as the second product molecule.
All living things do the same thing - they use food energy (sugar molecules) and oxygen to make energy, and put carbon dioxide into the atmosphere.
Plants, as well as respiring like animals, also do photosynthesis. This is the opposite chemistry.
Demonstrate (or students can build) 6 carbon dioxide and 6 water molecules combining together to make the reverse chemical reaction, producing a sugar molecule (glucose, C6H12O6) and 6 oxygen molecules.
Grades taught
Gr 5
Gr 6