Print out the template (attached below) on letter-sized paper.
Cut each sheet on the solid lines, to make 6 helicopter templates.
Hand a template out to each student.
Students cut on the dotted lines, then lift up the outside ends and paperclip together. (With younger students practice using the paper clip on the uncut template first.)
Write name on.
Hold with the paperclip hanging at the bottom and drop from a height - over a balcony is ideal, but standing on a chair works fine.
Watch the helicopters start to spin after falling a short distance.
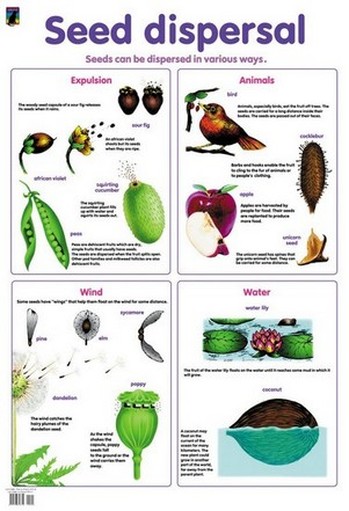
The paper clip models the actual seed (which will become the plant) and the paper part models the wings that make it spin as it falls. The spinning slows how fast it falls, so that any wind carries the seed sideways away from the parent plant.
Discuss how maple, sycamore and other helicopter-like seeds have a similar shape and spin in the same way as they drop from the tree when the seeds are ripe. As they descend slowly, any wind will move them sideways, so that they fall further from the parent tree, and are more likely to find enough sun, water and space to grow into a tree.
Collect real maple seeds and drop the to watch them spin. They will not always find the right orientation to start spinning from lower drop heights, so try a few times. (I have also found that the one-winged blades spin more reliably than the two-winged, so break them in half if necessary.)
With the paper model helicopters, experiment with longer blades, more paperclips for extra weight, different thicknesses of paper to find out which ones stay aloft the longest.
Optional: try outside in a light wind, or add a fan or blow dryer from the side to see how far they can drift away from where they were dropped.
Alternative design from here:
https://www.exploratorium.edu/science_explorer/roto-copter.html
https://www.nasa.gov/pdf/205711main_Rotor_Motor.pdf
There are many other designs online - search for "paper helicopter".