ingridscience
Moon and Stars from Earth
Summary
Two activities that show how we see the phases of the moon, and the shapes of constellations, from Earth.
Procedure
Do the activities in turn.
Discuss how from Earth we have one view of bodies in our galaxy.
Grades taught
Gr 2
Gr 3
Mirror symmetry patterns
Summary
Draw a pattern on paper and use a hinged mirror to make multifaceted shapes with it. Older students can measure the angle between the mirrors and graph against the number of images. Use for exploring light and symmetrical shapes in nature.
Science topic (2005 curriculum connection)
Physical Science: Properties of Objects and Materials (grade K)
Physical Science: Light and Sound (grade 4)
Physical Science: Chemistry (grade 7)
Materials
- small piece of paper for each student
- colouring pens or crayons
- two mirrors attached at one edge, so that they can fold in and out, for each student
- for older students: protractors and worksheet
Procedure
Students make a drawing on a piece of paper and lay it under the angled mirrors so that a symmetrical shape is made by the mirrors.
By changing how far apart the mirrors are, the number of images in the mirrors changes.
Also try looking at your face, or other objects, in the mirrors, and changing the angles.
For a lesson on light:
Allow students to explore, then discuss with them the principles of light that they are observing: Some objects are visible because they reflect light. Light travels in straight lines. Light can be reflected multiples times. To see an object, light from it must come into our eyes.
For a lesson on snowflakes with younger students:
Ask students to make a six pointed star, like a snowflake. Change the decorations on the point to make differently-shaped snowflakes, but they all have six points.
For a lesson on rotational symmetry for older students:
By changing the angle between the hinged mirrors, students make symmetrical shapes with different orders of symmetry. The angle between the mirrors determines the number of images.
Ask students to record the the number of images (including the original) and the corresponding angle, to fill in the Mirror Symmetry data sheet.
When the data is plotted on a class graph it will show an inverse relationship between the number of images and angle. The product of the angle and the number of images should be roughly 360, though there will be some deviation from this ideal with the class data (as is true for any real data).
For a lesson on relationships and patterns for younger students:
Students can draw the angle of the mirrors (by tracing along the inside edge of the hinged mirrors), and write down the number of images they see. Then can be asked if the number of images gets larger / smaller as the gap between the mirrors gets wider / smaller. (There is an inverse relationship: larger number of images with a smaller gap (angle) between the mirrors.)
For a lesson on crystals:
By changing the angle between the hinged mirrors, students make symmetrical shapes with different orders of symmetry. The angle between the mirrors determines the number of images.
Older students can record the the number of images (including the original) and the corresponding angle, to fill in the Mirror Symmetry data sheet.
Discussion: The polyhedrons of crystal shapes also have rotational symmetry e.g. a cube has four orders of symmetry and a hexagonal prism has six orders of symmetry. Refer to real crystal shapes already encountered.
Plot the class data on a graph. It will show an inverse relationship between the number of images and angle. The product of the angle and the number of images should be roughly 360, though there will be some deviation from this ideal with the class data (as is true for any real data).
Crystals have rotational symmetry, so have the same relationship between the number of faces and the angles between them. As crystals are built up from units in a regular ordered way, for each type of crystal the angles between faces are always the same. Sometimes, one or more faces of a crystal grows larger than other faces, so that the overall crystal shape is not as regular, but the angles between the faces still remain constant.
For a lesson on the symmetrical nectar guides of flowers:
Students draw one petal and draw a pattern on it, then use the mirrors to make it into a multi-petal flower. They can look at real nectar guides, and modify their patterns to try and duplicate them.
One petal with nectar guides can be placed between the mirrors to create a flower with nectar guides leading to its centre.
Outdoors, using plants that are flowering, students can try placing a folding mirror around one petal and make a flower with different numbers of petals.
Notes
From Mirrors book (resource), p.14.
Use the sun or flashlight to make a shadow kaleidoscope.
For a "ray trace" of hinged mirrors at different angles see http://web.physics.ucsb.edu/~lecturedemonstrations/Composer/Pages/80.09…
Grades taught
Gr K
Gr 1
Gr 2
Gr 3
Gr 4
Gr 5
Gr 6
Gr 7
Crystal shape observation
Summary
Look at common crystals close up to see their shapes. Use magnifiers/microscope for smaller crystals.
Science topic (2005 curriculum connection)
Physical Science: Properties of Objects and Materials (grade K)
Physical Science: Properties of Matter (grade 2)
Physical Science: Chemistry (grade 7)
Materials
- sugar crystals - granulated sugar (or grow your own by dissolving 3 cups of sugar in 1 cup hot water, then leaving for a few days)
- salt crystals
- epsom salt crystals (from the pharmacy, or grow your own)
- optional: other found/purchased crystals where the shape can be seen e.g. amethyst
- magnifiers ideally 10X
- stereo microscope
- small square of black paper
Procedure
Look at real crystals and match their shapes with drawings.
Under a dissecting microscope: put a few salt/sugar/epsom salt crystals in a small baggie. Place the baggie on black paper to show up the crystal shapes.
Using a magnifier: look at larger sugar or epsom salt crystals, or crystals in rocks.
Salt crystals are cubes. They are best seen under a microscope at 20X or 40X.
Sugar and epsom salt crystals are monoclinic prisms. The smaller crystals of purchased sugar (granulated) or epsom salts (from a pharmacy) best seen under a microscope at 20X or 40X to view the elongated shape with a pointed end. Grow larger sugar or epsom salt crystals and observe with a magnifier or the naked eye.
Amethyst (a kind of quartz) crystals are hexagonal pyramids. They are large enough to see with the naked eye.
The atoms in each of the crystals link in a certain pattern, so making a certain shape crystal.
Grades taught
Gr K
Gr 1
Gr 2
Gr 3
Gr 4
Gr 5
Gr 6
Gr 7
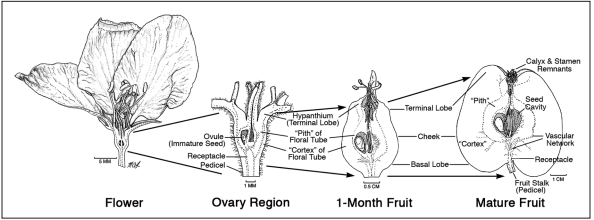
Flower or apple dissection
Summary
Dissect a flower to find the parts (stamen and pistil) and discuss pollination, fertilization, how seeds form.
Cut open an apple to find the seeds.
Cut open an apple to find the seeds.
Science topic (2005 curriculum connection)
Life Science: Needs of Living Things (grade 1)
Life Science: Plant Growth and Changes (grade 3)
Materials
- Flower with easy to find and identifiable stamen and pistil e.g. lily. After buying from store make sure the anthers and stamen are attached (they sometimes remove them), then keep for a while for the pollen to build up
- Magnifier
- Apple and knife to cut open
Procedure
Students pull apart a flower and look for these parts:
1. anther. the pollen is on the anther. the anther is part of the stamen (made up of the filament stalk supporting the anther)
2. stigma. pollen lands on the (often) wide, sticky stigma. the stigma is part of the pistil (made up of the stigma at the top, style (the stalk) and ovary (inside the flower).
Look at an apple, inside and out, to show these parts:
1. dried remains of the stigma and style at one end of the apple
2. ovary case inside, containing the seeds. the apple flesh is the swollen ovary.
See these links for the parts of the flower becoming the parts of the apple:
https://www.researchgate.net/profile/Alexandra-Buergy/publication/35122…
https://www.queenorchard.com/uploads/2/7/7/8/27781757/apple-picture_ori…
Discuss the process of fertilization and maturation:
Pollen from an anther is transferred to a stigma (by insects or wind). Sometimes it can be between the same flower or plant (self-pollination); other times it has to be different plants (cross-pollination).
DNA from the pollen grain travels down the style to the ovary, where it meets the egg, and fertilization happens.
A seed grows in the ovary
The seed can make a whole new plant
Discuss fruit formation:
After fertilization, the ovary around the seeds swells to make the fruit. (see photo of new fruit forming)
This fruit is attractive to animals, that eat it and transport the seeds elsewhere to make new plants.
Grades taught
Gr K
Gr 1
Gr 2
Gr 3
UV flower pattern matching game
Summary
Students match pairs of flower picture cards that have visible and ultra-violet light images of the same flower. Learn how a bee is guided to the centre of a flower with their UV-sensitive vision.
Science topic (2005 curriculum connection)
Life Science: Needs of Living Things (grade 1)
Life Science: Animal Growth and Changes (grade 2)
Life Science: Plant Growth and Changes (grade 3)
Materials
- flower picture pairs: 6 (or so) the same flower taken in both visible and UV light (see references below for ideas)
- transparent copy of the UV light patterns
Procedure
Before the lesson:
Gather images of the same flower taken in visible light and UV light, and print with permission, or use from a webpage.
Link suggestions:
1. http://www.naturfotograf.com/UV_flowers_list.html#top/ (permission needed for printing).
The following images have a "strong bulls eye pattern" or are described as "strong" in the description:
Arnica angustifolia (Arctic sunflower) http://www.naturfotograf.com/UV_ARNI_ANG.html
Bidens http://www.naturfotograf.com/UV_BIDENSZ.html
Oenothera biennis http://www.naturfotograf.com/UV_OENO_BIE.html#top
Potentilla reptans http://www.naturfotograf.com/UV_POTE_REP.html#top
Rudbeckia hirta http://www.naturfotograf.com/UV_RUDB_HIR.html#top
Sow thistle (looks like a branching dandelion), Sonchus arvensis http://www.naturfotograf.com/UV_SONC_ARV.html#top
Tripleurospermum maritimum http://www.naturfotograf.com/UV_TRIP_MAR.html
2. https://twitter.com/EntomoDaily/status/1651972037013913601
3. https://www.researchgate.net/figure/Floral-images-in-visible-and-UV-lig…
4. https://www.sciencephoto.com/search?q=ultraviolet%20light%20flower&medi…
If prints of the flowers are available, make a transparency copy of the UV patterns.
Students are asked to pair the images, first by shape only (as the colours are different).
Tell them that the pairs are the same flower photographed in two different ways. One of each pair is photographed in visible light, the same as how we see the flower. The second is taken with a camera that can see ultra violet light. We cannot see ultraviolet, but a bee can.
Ask students to lay the UV pattern over the visible pattern - this is what a bee sees - both the visible and the UV patterns together. Students should take apart and rematch the pairs, to explore what we see and what a bee sees.
Discussion: The UV pattern circles or highlights the centre of the flower, where the pollen and nectar are, so the bee is guided by the UV pattern to the nectar and pollen. UV patterns are also called 'nectar guides'.
Other colours seen by animals which humans cannot see:
Snakes can see well in infra red, which is heat, to help them catch (warm) prey.
Reptiles, amphibians, birds and insects can all see more colours than humans.
Notes
Other animals' colour vision:
Cats have green and blue opsins (not red) - protanopia.
Activity idea: use cyan filter to start, then add colours to play with.
Grades taught
Gr K
Gr 1
Gr 2
Gr 3
Gr 4
Pollen collection
Summary
Find and collect pollen in flowers.
Science topic (2005 curriculum connection)
Life Science: Needs of Living Things (grade 1)
Life Science: Plant Growth and Changes (grade 3)
Materials
- flowers with heavy pollen, ideally of different colours. lily with stamen works.
- magnifiers
- Q-tips or pipe cleaners of contrasting colour to pollen colour
Procedure
Bees collect pollen, to feed growing bees in the hive.
Pollen can be different colours, to attract bees.
Once students know that the pollen is on the anthers of a flower, give them magnifiers to find it, look at it closely, and find out what colour it is.
(Tulips have black pollen. Orange lilies purchased in florists have red-brown pollen. Fireweed has green pollen.)
Give them pipe cleaners to gently touch the anthers to pick up pollen.
Notes
With McBride Elementary, the tulips were not open at Van Dusen, so we used lilies that I had purchased to collect pollen.
Grades taught
Gr K
Gr 1
Gr 2
Gr 3
Extracting dyes from plants
Summary
Crush plants to see the dye colours that are released, and learn about Indigenous plant dyes. Optional: use plant dye(s) to make art.
Science topic (2005 curriculum connection)
Life Science: Plant Growth and Changes (grade 3)
Materials
- worksheet (attached)
- plants to crush: oregon grape stem, dogwood stem, green grass/leaves, yellow and red flowers, blueberries
-
Optional for art:
- green fern, ideally without spores underneath
- yellow flowers e.g. dandelion, buttercup
- thick white paper (~100lb) or light cloth
- tape
- hammer or smooth flattish rock
- wooden board/chalk board/hard surface to hammer on
Procedure
Crush the plants on the worksheet, to show what colour dyes they contain. The colour may change depending on the chemistry of the paper, and some colours will fade with time as light changes their chemistry.
Crushing to extract the juice from a plant is one of the methods used in plant preparation. Other Indigenous methods for preparing medicinal plants (from J Ethnobiol Ethnomed. 2012; 8:7):
| Preparation method | Decription |
| Paste | Fresh plant parts are crushed to obtain a paste used externally or internally. |
| Poltice | Plant parts are crushed to obtain a soft moist mass generally used externally to treat swellings, pain, inflamed or infected body parts. |
| Juice | Obtained by squeezing or crushing plant parts and filtering through cloth. Sometimes requires addition of freshwater or other liquid for dilution. |
| Powder | Obtained by crushing dried plant parts. |
| Chewing | Fresh plant parts are chewed without prior transformation. |
| Infusion | Plant parts are plunged in either hot or cold water for several minutes. If hot water is used infusion is taken as a tea. More than one plant species can be used in conjunction. |
| Decoction | Plant parts are boiled in water for several minutes and the extract is used. More than one plant species can be used in conjunction. |
Optional art project:
Lay pieces of fern on a piece of the cloth in a design you like.
Tape the ferns to the paper/cloth. Make sure they are completely covered with tape. If using paper, it is best if the tape is not to firmly attached ot the paper, so that it is easier to remove again.
Use the hammer, or a rock, to pound the ferns onto the cloth. Smash the ferns completely, so their colour transfers to the cloth.
Peel the tape and ferns off the paper/cloth.
If using cloth, glue it to card.
Green leaf chemistry:
The green colour in the fern leaves is called chlorophyll. In living plants, chlorophyll traps the sun's energy for plants to grow.
Indigenous groups have been making dyes from plants for thousands of years. The leaves, petals, bark and seeds of plants have all been used to make different dye colours.
Notes
Pink rhododendron petals also work well, and their colour lasts for a while.
Other BC native plant dye colours: https://learning.royalbcmuseum.bc.ca/wp-content/uploads/2018/11/Attachm…
Painting with BC invasive plants: https://bcinvasives.ca/for-educators/activity/painting-with-invasives/
and their plant colour guide: https://bcinvasives.ca/wp-content/uploads/2021/09/Painting-with-invasiv…
Indigenous separation methods from the Australian school curriculum: https://australiancurriculum.edu.au/TeacherBackgroundInfo?id=56834
Grades taught
Gr K
Gr 1
Gr 2
Gr 3
Gr 4
Gr 5
Gr 6
Smell pairs in herbs and plants
Summary
Pair up fresh and dried herbs, or smelly plants and their essence, by smell. Optional: look at the smell molecule shapes.
Science topic (2005 curriculum connection)
Life Science: Characteristics of Living Things (grade K)
Life Science: Needs of Living Things (grade 1)
Life Science: Plant Growth and Changes (grade 3)
Physical Science: Chemistry (grade 7)
Materials
Fresh herb match with dried herb (photos):
- Pairs of herb smells to compare from these: herb plants (growing in a garden/cut fresh herbs); bottles/bags of the same herbs dried with contents concealed; herb essence in a bottle
- Molecule models of herb smells e.g. carvone (mint smell), carvacrol (marjoram smell) to compare
Plant part match with smell of essence:
-
Plant samples, and their odour in an opaque squeezy bottle, suggestions below:
- coffee beans, in a glass jar, and in an opaque plastic squeezy bottle
- lemon slices in a glass jar and lemon essence in an opaque plastic squeezy bottle
- cedar wood piece in a glass jar and cedar essence or odiforous cedar wood in an opaque plastic squeezy bottle
- lavender flower heads in a glass jar and lavender essence in an opaque plastic squeezy bottle
- oregano leaves in a glass jar and oregano essence or odiforous leaves in an opaque plastic squeezy bottle
- cinnamon sticks in a glass jar and cinnamon essence or odiforous cinammon sticks in an opaque plastic squeezy bottle
- garlic head in a glass jar and garlic essence or odiforous cut garlic bulb in an opaque plastic squeezy bottle
Procedure
Try to pair up each fresh with dried herb, or dried herb with herb essence, or fresh herb with herb essence.
Herbs may smell strong to discourage animals from eating them.
You can smell the herbs and spices because some of the molecules leaving the herb or spice go up your nose and interact with molecules in your nose. We smell them when their unique shapes fit like jigsaw pieces into the inside of our nose, and stimulate a nerve signal to our brain, which we perceive as smell.
Pair up fresh herb with smell of dried
Students smell the real herbs, by brushing their hands against them then smelling their hands.
Match with bags of dried herbs, whose identity is hidden (see photos).
The pairs of fresh herbs/dried herbs/essences probably didn't have exactly the same smells as they all release slightly different mixtures of smell molecules.
However there is often a main molecule responsible for each distinctive herb smell, so we cue into this odour molecule to match the smells.
Each of the smells has many molecules making it up, but sometimes a predominant molecule that is responsible for the smell:
Oregano has the molecule carvacrol in its smell. Anise seeds have the molecule anethole in their smell. Cloves have eugenol in their smell. Mint has L-carvone in its smell. Garlic has allyl- disulphide in its smell. Rosemary has eucalyptol in its smell.
Optional: show molecule models of the predominant smell molecules in mint and marjoram smells (see photo):
See if students can spot the difference between the molecules responsible for mint and marjoram smells.
Although the chemical shapes are similar, they smell very different.
Most smells are complex mixtures of many molecules so smells often mean something quite different to each of us.
Pair up plant part with smell of essence
Squeeze and sniff the smelly bottles (containing essences). Look at the plant pieces inside the glass jars. Match them up.
Students can also try and match each smelly bottle and jar of plant pieces with a picture of the plants they come from.
For younger students, duplicate the smelly bottles, and ask them to match up the ones that smell the same - use fruity smells too.
For very young students make into a game, where each table is a team. All tables are given the same-smelling tube at one time. The students at a table work together to try and guess what the smell is, and write it down. When the time is up, they hold up their written answer.
Optional for older students: which part of the plant dos each plant piece come from? (Leaves, flowers, seeds, bark or trunk?)
Coffee beans are seeds.
Cedar wood is the trunk.
Lemons are the fruit.
Lavender is the flower.
Oregano is the leaves.
Cinammon is the bark.
Garlic is the bulb (underground leaves).
Notes
See the "smelly booklet" from the New York Hall of Science (attached) for comparing the smells of herbs and the single molecule responsible for their smell. Single molecules difficult to obtain and store, so only done in this museum setting.
Grades taught
Gr K
Gr 1
Gr 2
Gr 3
Gr 4
Gr 5
Gr 6
Gr 7
Fruit ripening smells
Summary
Use your sense of smell to identify fruits. Find out how the smell changes as fruits ripen.
Science topic (2005 curriculum connection)
Life Science: Characteristics of Living Things (grade K)
Life Science: Plant Growth and Changes (grade 3)
Materials
- Containers that hide their contents, but allow smells to leave them (I poked holes in the caps of 50ml Falcon tubes, and made foil sleves to hide the contents, until they are slid down)
- Ripe and unripe tomato in each of two containers
- Ripe and unripe banana in each of two containers
- Ripe and unripe strawberry in each of two containers
Procedure
Two tubes contain tomato, two tubes contain banana and two tubes contain strawberry.
Smell the tubes and find the pairs.
For each pair, one tube contains ripe fruit and one contains unripe fruit.
Can you smell which is ripe and which is unripe?
Check your smells by pulling the sleeve down off the tube.
What's going on?
As a fruit ripens it makes new chemicals that change its smell.
Ripe smells attract animals, which eat the fruit and spread the seeds.
Fruits also change colour as they ripen, also to attract animals.
What colour is your favourite fruit before and after it ripens?
Grades taught
Gr K
Gr 1
Gr 2
Gr 3
Gr 4
Gr 5