ingridscience

Animal senses

Summary
Activities on animal senses that are weak or absent in humans: echolocation, seeing in ultra violet and infra red, magnetoreception.
Curriculum connection (2005 science topic)
Earth and Space Science: Stars and Planets (grade 3)
Procedure

A series of activities exploring different kinds of animal sensing.
The first three can be stations to rotate through, one half of the class doing 'Ir detection", while the other half is split betweebn 'UV detection' and 'Magneto reception' activities; then switch.
The final two activities need to be done as a class.

UV detection
UV patterns in flowers is a puzzle, showing the ultra violet pattern that bees can see in flowers.
The UV pattern often emphasizes the centre of the flower where the nectar is.

Magneto reception
Bees, as well as bacteria and many migrating animals like birds and turtles can sense the Earth’s magnetic field and the patterns it makes, to migrate with the seasons, and to map and find their breeding and feeding grounds.
Bird migration active map: https://www.allaboutbirds.org/news/mesmerizing-migration-watch-118-bird…
We don’t know exactly how they do it - we are still learning.
One way of detecting magnetic fields uses a mineral (a part of a rock) called magnetite.
Students find magnetite in beach sand using a magnet.

IR detection
At the other end of the light spectrum is Infra red, which we sense on our skin (as warmth).
Some snakes, the pit vipers (pythons, boas, and rattlesnakes) have special pit organs. They can detect changes in 0.002-0.003 degrees C, 10X our sensitivity.
We have tools that can help us see where heat is coming from.
Students look at the images from IR cameras - search for 'infra red images' to find many online.
Experiment with heat sensitive paper - it shows temperature change by turning colours.
Students use the heat of their hand or use IR radiation from the bulb (don't touch the bulb), to make the sheets turn colours and indicate how much heat is hitting them.

Ultrasound and infrasound
Use a tone generator to show how different people in the classroom detect different sound frequencies People can hear between 20Hz and 20,000Hz. Younger people can hear higher frequencies.
Some animals can hear above us (called 'ultrasound' and is above 20,000Hz). Dolphins can hear as high as 150,000Hz. Bats hear as high as 120,000Hz.
Some animals can hear lower than us ('infrasound', lower than 20Hz). Elephants can hear as low as 5Hz

Echolocation
Some animals use sound bouncing off objects to map the world around them and catch food.
Bats, dolphins and whales, birds that live in caves (kind of swift), shrews.
People have tools to echolocate, like sonar (to map underwater) [radar is an electromagnetic wave].
Some blind people ‘click’ and echolocate.
Go outside to bounce sound off a wall, to show how echolocation works.

Grades taught
Gr 4

Planet surface features formed by wind and liquid

Summary
Model planetary landscapes formed by wind and liquid flow (aeolian and fluvial landforms). Compare the patterns formed to real images of planet surfaces.
Science topic (2005 curriculum connection)
Earth and Space Science: Stars and Planets (grade 3)
Earth and Space Science: Exploration of Extreme Environments (grade 6)
Materials
  • tray containing a little sand (about 50ml) and water
  • tray containing with a little sand and two rocks, with a plexi cover (to avoid sand blowing out)
  • straw
  • images of water/wind erosion on planets
Procedure

Introduction:
Images of planets’ surfaces sent back to earth often have abstract patterns that need to be interpreted.
Scientist use their knowledge of the formation of features on Earth and other background knowledge they have about a planetary body to identify geologic features of planets and hypothesize about how those features may form on these other worlds.
Two kinds of features are "aeolian": formed by wind, and "fluvial": formed by a liquid.
Scientists use their knowledge of what kinds of patterns liquid water and wind make to find out if the planet did have/has running water (or other liquid), and has wind (therefore an atmosphere).

Students make patterns with wind and water:
Aeolian (wind) patterns are made by spreading sand evenly in a tray, adding two rocks to one end of the tray, and blowing the sand along the bottom of the tray from the other end. A plexi sheet covering most of the tray prevents sand from blowing out of the tray. The sand is blown from around the rocks, but remains in a streak behind the rocks (see first two images).
Fluvial (liquid) patterns are made by swirling a tray of sand and water to mix them evenly, then tipping the tray so that the water runs through the sand, creating channels. (See third image).

Students compare the patterns they make to those seen on other planets, and deduce what formed each of the pictured planetary features. (See fourth image, and links below.)

Discussion:

Mars features are both fluvial and aeolian:
A drainage network of a liquid is clearly seen. There is no liquid on Mars now, only ice water. This fluvial feature is from extensive water flow in the past when Mars was warmer. Why was Mars warmer? Maybe it had an atmosphere to create a greenhouse effect. Or maybe asteroid and comet impacts which filled the atmosphere with vaporized rock and ice, resuled in several years of rainfall and flooding that formed the fluvial erosion features.
The wind streaks seen on Mars are from erosion of the surface rock. Erosion needs an atmosphere - a gas that can move past the surface and carry dust particles along. This is happening on Mars now - we have seen tornadoes on Mars.
We also see dunes on Mars, evidence of aeolian activity.

Venus feature:
Wind streaks are seen. Winds are from carbon dioxide atmosphere blowing fine-grained particles around.

Titan (moon of Saturn) feature:
Drainage networks from a liquid are seen. They are formed by liquid methane! Venus has a methane cycle: it rains methane, which flows into methane rivers and lakes, from which it evaporates and rains again (just as we have a water cycle).

Images and information from the NASA ARES site resource. Specific web links:
Visual summary of how different planetary features are formed at https://ares.jsc.nasa.gov/interaction/eeab/pdfs/bmm/bmm_quickreferences…
Images of various planet features at https://ares.jsc.nasa.gov/interaction/eeab/pdfs/bmm/bmm_planetaryfeatur…

Attached documents
Notes

See Aeolian processes activity in http://www.nasa.gov/pdf/58263main_Planetary.Geology.pdf for more ideas for set up.

Grades taught
Gr 6
Gr 7

Solar System to scale

Summary
Make a scale model of the solar system stretching 300m across and beyond the school grounds, starting with a 10cm-diameter sun.
Science topic (2005 curriculum connection)
Earth and Space Science: Stars and Planets (grade 3)
Materials
  • printed image of the sun, 10cm in diameter
  • modelling clay in these colours: grey, red, orange, blue, white, brown, green; or colours that can mix to make them
  • rulers showing mm
  • metre stick or tape measure
Procedure

Before the class, map a route that extends from the classroom to 300m away, using streets that keep the route on a straight line as possible.
Google maps has a "measure distance" feature which works well for mapping the route and the location of each planet.

Inform students that we will make a 1:10,000,000,000 scale model of the solar system. Discuss what a scale model is if necessary.
Together with the students, write up the planets in order.
Stick the sun image to the board, and ask students that if the sun in our model has a 10cm diameter, what's their guess on how large would the other planets be? Add the scaled dimension of each planet to the list, while discussing relative sizes of the planets.
Assign each table group to one planet, that they will make to scale. (The inner planet or two can be done by the teacher to demonstrate the method if there are more planets than student groups.)
Either give them a sheet showing the planets' colours, or list the planets' colours from students' knowledge.
Then distribute the modelling clay colours that the students need to make their scaled planet. If they use a couple of colours, the larger planets can have a swirly pattern that mimics the planet's appearance.

Sun/Planet Clay colour Size Scaled distance from sun
Sun (Printed image) 10cm -
Mercury dark grey 0.5mm 4m
Venus red 1mm 8m
Earth blue 1mm 11m
Mars red 0.5mm 16m
Jupiter red-brown 1cm 56m
Saturn light red-brown 8mm 103m
Uranus light blue 3mm 206m
Neptune dark blue 3mm 323m

Distances calculated using https://www.exploratorium.edu/ronh/solar_system/
If you want to add in Earth's Moon to scale, its diameter is 0.2mm and it orbits 2.5cm from Earth. Other planets have moons too.
(See this activity for modelling just the Sun, Earth and Moon to scale.)

Once their planets are made, discuss and fill in the scaled distance from the sun to each planet.
Ask students to fold their planet into a piece of scrap paper (so that they don't get lost) and to write their distance on the outside of the paper.
Using the metre stick or tape measure, have the students calibrate their pace to a metre.

Group by group, the students pace from the sun and out to each planet in turn, pacing out the metres. The rest of the class follows the planet that is being placed.
After only one or a couple of inner planets, the scale model will leave the classroom and head outdoors. The outer planets will be off the school grounds into a park or street beyond.

Other features to optionally include on the walk: the Asteroid belt is between Mars and Jupiter and the Kuiper belt (which includes Pluto) is beyond Neptune.

Once at the final planet, pause to reflect on how far the group has walked, how tiny the planets are on the way, and that between them is empty space.
Walking back along the route, and finding the tiny planets along the way reinforces how large the solar system is and how small the planets are in it.

Information on classes of objects that orbit the sun
Planets - now 8 planets, as Pluto is now classified as a dwarf planet. To be a planet, an object needs to 1. be massive enough to pull itself into a sphere under its own gravity 2. is not massive enough to cause thermonuclear fusion (like a star) and 3. has cleared its neighbouring region of smaller objects i.e. they are attracted by its gravity.
Dwarf planets - large enough to be spherical, but too small to clear their neighbourhood of smaller objects. There are many many dwarf planets orbiting the sun, and more are continuously being discovered. Examples: Ceres in the asteroid belt, Trans Neptunian objects (TNOs) such as Pluto, Eris, Makemake, Haumea. Try this page for images of their orbits: http://cnx.org/resources/66fc832ba8fa89f299d718228e06c7cb0ad85924/OSC_A… and this page to show more dwarf planet orbits: http://www.duncansteel.com/archives/2140
Asteroids - small irregularly shaped objects made of rock, metal or a mixture of both, found in the asteroid belt. Image of main asteroid belt at: http://www.rawscience.tv/wp-content/uploads/2014/09/asteroid-belt.jpg
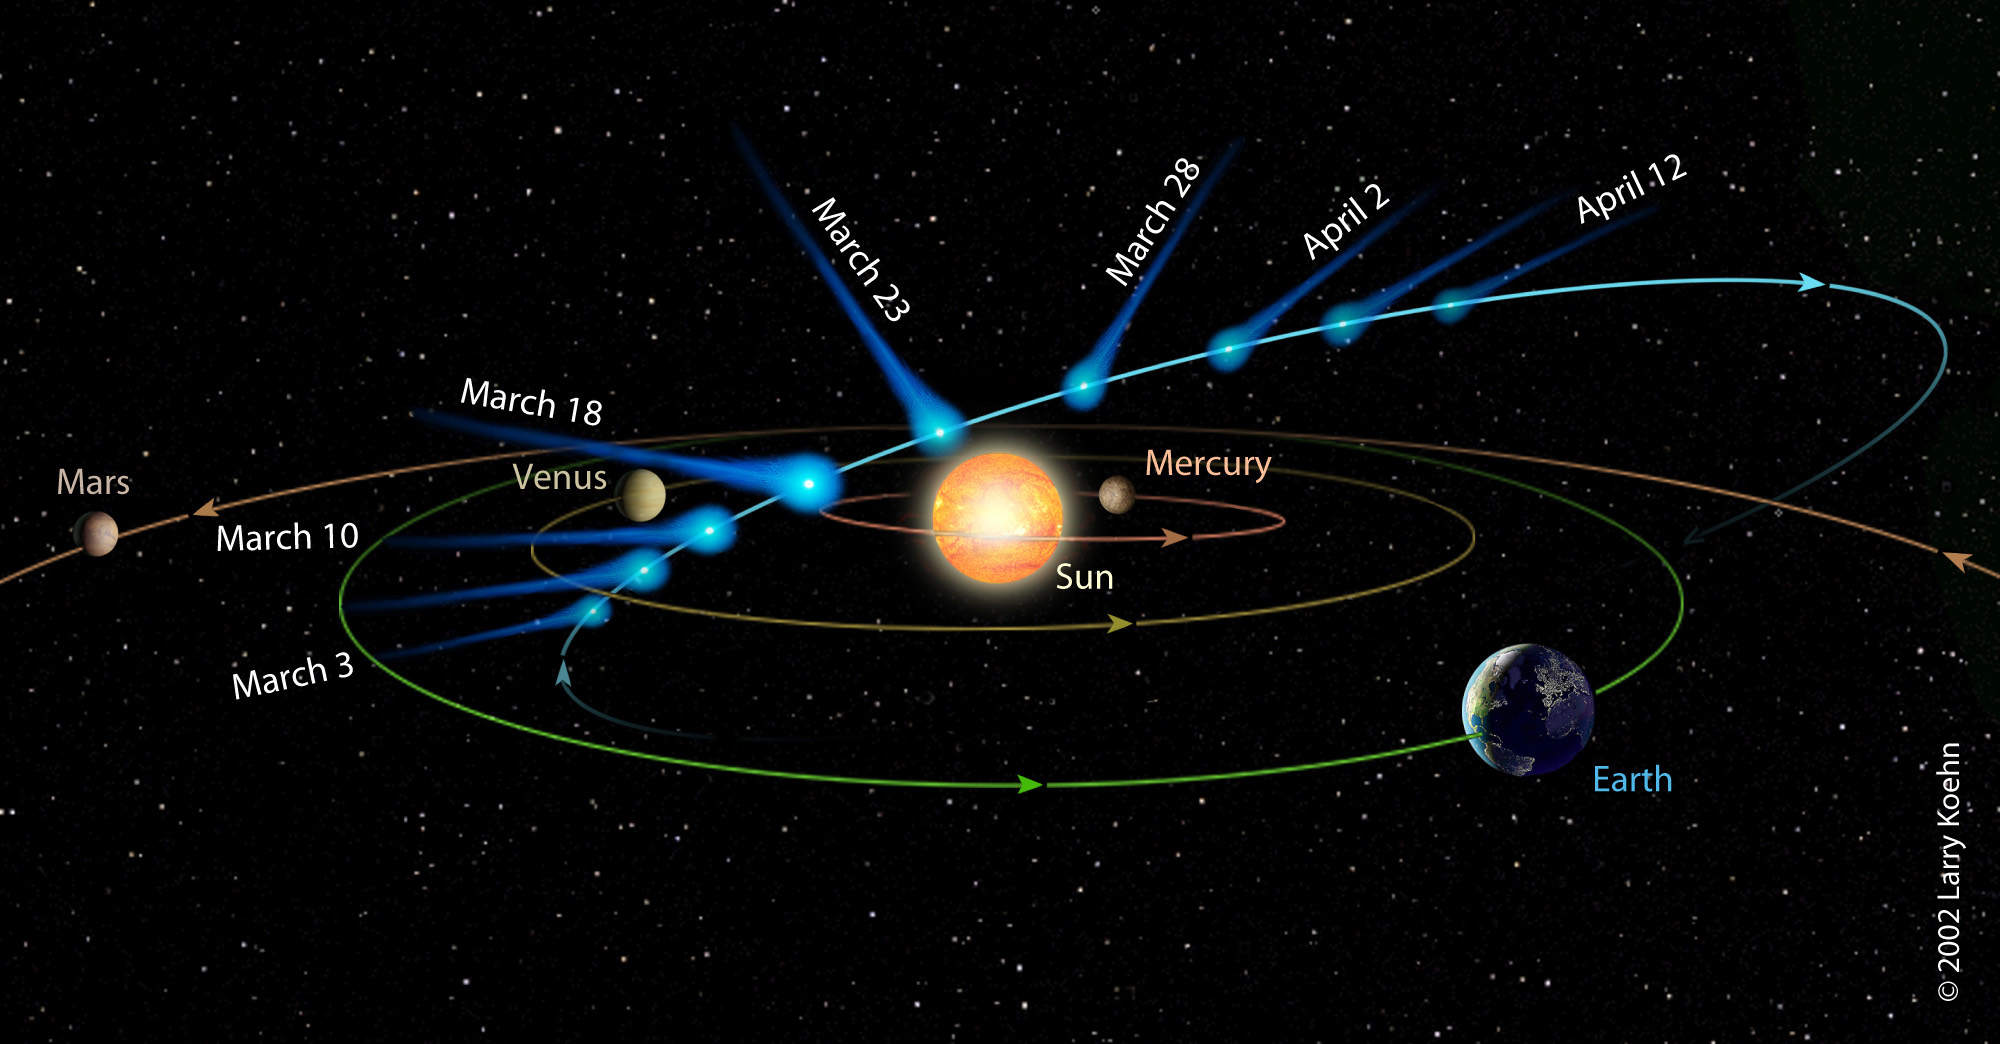
Comets - snowballs of frozen gases, rock and dust the size of a small town. A comet warms up near the sun and develops a coma (atmosphere), a glowing head, hundreds of thousands of km across. It has two tails (which always point away from sun), one gas and one dust (which curves with sun’s gravity). Image of comet structure through its orbit: http://www.skyandtelescope.com/wp-content/uploads/Koehn_IZ_orbit_300dpi… Comets may have brought water and organic compounds (the building blocks of life) to Earth and other bodies in our solar system. There are billions of them. Image of some comet orbits at: http://www.wired.com/images_blogs/wiredscience/2013/08/Orbits_of_period… (Orbit times: Halley orbit is 76 years, Borrelly orbit is 7 years, Ikeya–Zhang orbit is 366 years and is the longest known orbital period.)

Notes

Scroll through screens to see planets and moons to scale at https://joshworth.com/dev/pixelspace/pixelspace_solarsystem.html

Grades taught
Gr 4
Gr 5
Gr 6
Gr 7

Fossils

Summary
Look at real fossils. Learn how fossils are formed and found in sedimentary rock.
Curriculum connection (2005 science topic)
Earth and Space Science: Stars and Planets (grade 3)
Procedure

Look at real fossils.

Fossils are sometimes formed when living things get trapped in layers of sediment. If the living thing does not rot, as the layers of sediment pile up, their body is replaced by rock, or they leave an imprint in rock.
If those sedimentary layers are later uplifted, the fossils can come near enough to the surface for us to find them. The age of the fossil is dated by the age of the rock layers it is found in.
The sedimentary uplifting activity shows how fossils trapped in sedimentary layers are later uplifted to the surface.

Grades taught
Gr 2
Gr 3

Gravity Assist Model

Summary
Use a steel ball rolling past magnets to model gravity assist (also called gravitational slingshot or swing-by), which is used to alter the path and speed of spacecraft visiting planets and their moons in the solar system.
Science topic (2005 curriculum connection)
Earth and Space Science: Stars and Planets (grade 3)
Materials

For a group of 2-4 students:

  • shallow tray to contain activity
  • plexi sheet that fits into the tray
  • 4 blocks to support plexi sheet
  • 3 or more (disc) magnets - dollar store magnets fine
  • masking tape
  • steel ball
  • ramp to roll the ball down (I use folded stiff plastic hot-glued to a block)
  • dry erase pen
  • ruler (short ideal, so that it can fit across the tray)
  • protractor
  • optional: worksheet (see attached)
Procedure

Introduce gravity assist:
We have used rockets to send probes to many parts of the solar system, and beyond.
Show image of current position of probes: http://www.planetary.org/multimedia/space-images/charts/whats-up-in-the…
For sending spacecraft these long distances, we need to keep the fuel usage to a minimum, as much of the weight of a rocket is fuel (90%). Once rockets have used much fuel to escape earth’s gravity, we can use the gravity of the sun or other planets to alter the path and speed of a spacecraft, with minimal further fuel usage. Using the gravity of other bodies to change the speed and direction of a spacecraft is called “gravity assist”, “gravitational slingshot”, or “swing-by”, and has been used to send probes to the outer reaches of, and beyond, the solar system. Gravity assists of close approach can last a few hours. The amount by which the spacecraft speeds up or slows down is determined by whether it is passing behind or in front of the planet as the planet follows its orbit. 

Students will model gravity assist by rolling a steel ball (the "spacecraft") down a ramp onto a plexi sheet, which has a magnet (the "gravity" of a planet) in its path. The spacecraft is deflected by the gravity of the planet as it passes by. The amount of deflection depends on the speed of the spacecraft, how close it passes by the planet and the gravitational strength of the planet.
This activity is adapted from: https://solarsystem.nasa.gov/docs/Planetary_Billiards1.pdf and https://www.teachengineering.org/view_activity.php?url=collection/cub_/…

Show students how to set up the gravity assist activity:
Draw a line down the centre of the plexi, along its length.
Tape the magnet onto the plexi, positioned just to the side of the central line and half way along it.
Turn the plexi over so the magnet is underneath, and place the plexi on the four supports inside the tray.
Tape the ramp at one end of the central line, so that a ball rolled from the top of the ramp rolls along the line towards the magnet. When the ball is released from the top of the ramp, it should reproducibly deflect a small amount around the magnet. If it does not, adjust the height of the ramp or the position of the magnet.

Structured format to activity:
Students are asked to change one variable at a time: the speed of the spacecraft can be changed by releasing the ball from the top of the ramp (faster) or lower down (slower). The gravity of the planet can be increased (i.e. a larger planet) by adding magnets underneath the taped magnet.
Show students how to measure the angle of deflection for the different conditions they try: make a mark where the ball rolls off the plexi, and repeat until the marks are consistently on top of each other. Then draw a line from this mark back to the centre line next to the magnet. Then use a protractor to measure the angle between the centre line and the angled deflection path.
See attachment for worksheet.

Discuss class data:
Although there will be much variability in the angles measured (depends on slope of desk, position of magnet etc) , decreasing the speed of the spacecraft by releasing at a lower position on the ramp, should generally produce greater angles of deflection. Increasing the gravity of the planet, by adding more magnets, should generally produce greater angles of deflection.
A graph can be made of the increase/decrease in angle when changing from low to high gravity and high to low speed.

Give students more magnets and allow them to freely experiment with planet and ramp placement. Show them images of real gravity assist trajectories (see below), that they might want to try and replicate.

Free experimentation format:
Discuss some of the variables that the students will be working with: the speed of the spacecraft (by varying where the ball is released from), the gravity of the planet (by varying the number of magnets), the position of planet(s).

Show students trajectories of real spacecraft that have used gravity assist (see below), and challenge students to replicate some of these, and design their own trajectories.

Discussion: Students will want to share how they made their trajectories, some of them employing methods not in the kit (e.g. tipping the plexi to combine gravity with magnetic force to direct their ball). Direct the conversation towards how even a small tweak in the speed of the spacecraft or the position of a planet makes the trajectory change dramatically. When space scientists plan the route of a spacecraft they use complex mathematical modelling to ensure that the spacecraft reaches the intended destination. In their calculations, they need to take in to account that the planets are moving, and they cannot vary the gravity of a planet as this model can, so the launch timing is critical for success of a mission. Also reinforce the years that it takes for a probe to reach its destination planet - the distances are huge.

Real gravity assist trajectories (as of Spring 2019):
1. New Horizons flew by Jupiter (and sent back detailed images) to direct it to Pluto. New Horizons is currently in the Kuiper belt.
2. Juno flew by Earth for its gravity assist out to Jupiter. On its gravity assist to orbit Jupiter, it was a slow-down. [Ingrid check]
3. Voyager 1 used gravitational assist from Jupiter and Saturn and in August 2014 entered interstellar space. Voyager 2 swung by Jupiter and Saturn and then also Uranus and Neptune and just entered interstellar space. The paths of Voyager 1 and 2, showing the trajectory change from gravity assist: http://ase.tufts.edu/cosmos/view_picture.asp?id=310
News article when Voyager 2 entered interstellar space: https://www.cbc.ca/news/technology/voyager2-interstellar-space-1.5274614
4. Cassini (see attached file) was a 20 year mission, to orbit Saturn before descending beneath the rings and into Saturn's atmosphere. It arrived at Saturn with gravity assist from Venus, Earth and Jupiter: http://blogs.discovermagazine.com/sciencenotfiction/files/2010/06/cassi… The rocket that launched Cassini in 1997 was the most powerful available to NASA, but it still wasn't powerful enough to send the nearly 6,000-kilogram (13,200-pound) spacecraft on a direct course to Saturn. Instead, mission designers planned multiple flybys of Venus, Earth and Jupiter, using each planet's gravity to boost Cassini's sun-relative speed and send the spacecraft out to Saturn.
5. Juice (‘Jupiter Icy Moons Explorer’) was launched in 2023. It will use gravity assist of the Moon, then Earth, Venus, Earth and Earth again, then 223 Rosa (an asteroid) to get to Jupiter’s moon Ganymede in 2034.

Notes

Initially used modelling clay to hold the ramp in place. Much better when I switched to the ramp hot-glued to a block.

Grades taught
Gr 4
Gr 5
Gr 6
Gr 7

Rocket chemistry molecular modelling (liquid oxygen/liquid hydrogen)

Summary
Model the chemical reaction in LOX/LH2-powered rockets.
Science topic (2005 curriculum connection)
Earth and Space Science: Stars and Planets (grade 3)
Materials
  • molecule pieces for each student/student pair: 4 white hydrogen atoms, 2 red oxygen atoms, 4 bonds
Procedure

Show a dramatic video of a real rocket taking off e.g. a Delta IV Heavy rocket launching the Orion spacecraft (to be used in deep space exploration) Dec 2015: http://www.universetoday.com/117197/bringing-you-there-intense-sound-of…

Discuss how real rockets work:
The "rocket fuel" is mixed with an "oxidizer" in the combustion chamber. They chemically react and make new molecules, including a gas. The huge amount of gas produced (called "exhaust") can only escape out of a nozzle built into the back of the rocket. The action of the exhaust shooting out exerts an equal and opposite force on the rocket, which propels the rocket upwards. (Newton's Third Law of Motion: Action and Reaction).
(If the baking soda/vinegar rocket activity or Alka seltzer activity has been done, remind students that it is the same mechanism.)

Model the chemical reaction in real rockets:
Give the students their molecule pieces.
Write the oxidizer and fuel molecules on the board, ask students to build them:
O2 (liquid oxygen or “LOX”) + 2 H2 (liquid hydrogen or ”LH2”).
These are usually gas molecules (as some students may know), but in a rocket engine, they are stored at very low temperatures, so are liquid.
Tell them that in the fuel and oxidant are injected into the hot combustion chamber, where the oxygen and hydrogen chemically react to make a new molecule. Ask them to take apart their oxygen and hydrogens and rebuild two identical molecules.
They should make two water molecules, 2 H2O. They might recognize this molecule when it is called by it's chemical formula.
In the rocket combustion chamber the temperatures high enough that this water is a gas, which escapes through the nozzle and gives the rocket thrust.

Other facts about rocket fuels:

The fuel is a significant portion of the rocket mass, so as the fuel is burned up, the rocket gets significantly lighter and accelerates upwards.
The boosters (on the side) run out of fuel first, then the main engine.

The propellants of a rocket are often a "fuel" and a source of oxygen "an oxidizer".
The most efficient fuel and oxidizer combination is liquid oxygen (the oxidizer, also called LOX) and liquid hydrogen (the fuel, also called LH2), as we modelled here.
Liquid oxygen ("LOX") is the oxidizer commonly used in rockets.
Other fuels used besides liquid hydrogen are kerosene or methane.
Chemical reaction for kerosene: 2 C12H26(l) + 37 O2(g) → 24 CO2(g) + 26 H2O(g)
Chemical reaction for methane: CH4 + 2O2 → CO2 + 2H2O

A rocket where the fuel or oxidizer (or both) are gases liquefied and stored at very low temperatures (below −150 °C) is called a cryogenic rocket engine. If the propellants had been stored as pressurized gases, the size and mass of fuel tanks themselves would severely decrease rocket efficiency.

Rockets have to carry their own oxygen into space, where there is no air.
This is in contrast to aeroplanes, which use atmospheric oxygen to oxidize their fuel.

"Monopropellants" are just one molecule (e.g. hydrogen peroxide or hydrazine) that can split into gas molecules, with a catalyst to speed up the reaction. Hydrogen peroxide decomposes into oxygen and water gases. Hydrazine decomposes into nitrogen and hydrogen gases. The gases produced are directed through a nozzle to create thrust.

First liquid-fuelled rocket in was launched in 1926. It flew 12metres. First satellite, Sputnik, launched in 1957 by the Soviet Union. 1961 was the first person in space.

Grades taught
Gr 4
Gr 6
Gr 7

The Sun

Summary
Model the seasons as the earth orbits the sun, then try activities that model some phenomena of the sun.
Curriculum connection (2005 science topic)
Earth and Space Science: Stars and Planets (grade 3)
Procedure

Introduce the sun with a movie of the rotating sun:
http://sdo.gsfc.nasa.gov/assets/gallery/movies/FringePlay304.mp4

Continue with sun facts:
The sun rotates every 26 days.
It is very hot: 15 million°C in the centre, 5,500°C on the surface.
It is huge: 1.4million km wide. One million earths would fit in it.
The sun is a ball of gas, split into charged particles (plasma) by intense heat and pressure.
In it’s core, hydrogen nuclei fuse together to make helium nuclei, generating huge amounts of energy - so much that we can feel it from 150 million km (93 million miles) away.
The sun is 4.6 billion years old and has enough hydrogen to last for another 5 billion years. Every second, the sun’s core converts 4 million tons of matter into pure energy.

Model the seasons.

Students rotate through stations exploring different phenomena that are all present in the sun:

Plasma ball to show an example of plasma, which the sun is made up of.
Convection currents, to show how heat reaches the surface of the sun, and the patterns it makes.
Magnetic field lines, to show how they are formed by magnets. Then show the complex shapes of the moving magnetic fields of the sun.
Sounds of the sun, as an analogy for how scientists listen to the sun to learn about its interior structure.

If the sun is out, look at sunspots.

Notes

Lesson 2/7 at Strathcona.
Sun was not out, so no Sun Spot observation at Strathcona Elementary.

Grades taught
Gr 6
Gr 7

Sounds in a box

Summary
Figure out what is inside a box by listening to the noises it makes. Optional: use as an model for how we learn about the structure of the sun's interior by listening to it.
Science topic (2005 curriculum connection)
Earth and Space Science: Stars and Planets (grade 3)
Materials
  • empty shoe boxes or plastic tubs e.g large yogurt containers
  • optional: small metal balls (to roll against the objects in the box)
  • various materials to add to the boxes e.g. metal cups, soft cloth, rice grains, or found items
  • if needed: tape to seal the boxes
Procedure

For a free play activity using found objects:
One student adds an item to the tub e.g. pine cone, leaf etc. and snaps on the lid.
Their partner tries to guess what is in the tub, by shaking it and hearing the sounds made.

For a structured activity set up by the teacher:
Before the lesson, tape different items into shoe boxes, and leave one shoe box empty. I used metal cups in one, a ball of cloth in another, and rice in another.
Add a metal ball to each box. Seal the boxes. Make sure all holes are blocked, especially for a box containing rice grains.
Ask students to tip the boxes, and deduce what is inside from the sounds they hear.

Discussion on how scientists use sound to learn about the sun:
Scientists listen to the sounds coming from the inside of the sun, to learn about its interior structure. (Called "helioseismology".)
The Sun's sound waves bounce from one side of the Sun to the other in about two hours, causing the Sun's surface to oscillate, or wiggle up and down. Because these sound waves travel underneath the Sun's surface, they are influenced by conditions inside the Sun. So scientists can listen to the sun to learn more about how the structure of the Sun's interior shapes its surface.
The Sun's sound waves are normally at frequencies too low for the human ear to hear. To be able to hear them, the scientists sped up the waves 42,000 times, and compressed 40 days of vibrations into a few seconds.
What you hear in this audio track are just a few dozen of the 10 million resonances echoing inside the Sun:
http://solar-center.stanford.edu/singing/SOUNDS/three_modes_l_0_1_2.mp3

Notes

Adapted from page 7 of http://solar-center.stanford.edu/singing/Sol_Music.pdf
Use for echolocation activity??

Grades taught
Gr 4
Gr 5
Gr 6
Gr 7

Plasma Ball

Summary
Use a plasma ball to visualize plasma, to enhance discussion that the sun is made up of plasma.
Science topic (2005 curriculum connection)
Earth and Space Science: Stars and Planets (grade 3)
Materials
  • plasma ball
Procedure

Review states of matter that the students know: often just solid, liquid and gas.
Review the spacing of the atoms/molecules in each state of matter (close in solids, further apart and free to move in liquids, even further apart and even more energetic in gases) and that in each state the particles are progressively more energetic.
Tell students that when gas is energized even more, the atoms split apart and the electrons become free from the nuclei. This is a 4th state of matter, called plasma.

In the plasma ball, plasma is produced when electrons moving at high speed (from the central electrode to the glass of the ball) bump into gas atoms and break them apart.

In the sun, the extremely high temperatures and pressure split the atoms to make plasma.

Grades taught
Gr 6
Gr 7

Seasons model

Summary
Use a light bulb and a balloon or foam ball, to model the seasons on earth as we orbit the sun.
Science topic (2005 curriculum connection)
Earth and Space Science: Stars and Planets (grade 3)
Materials
  • room that can be made dark
  • light fixture with bulb, that can be placed in the centre of the room near head-height
  • balloon, one per student, light-coloured (alternative: small foam ball on a skewer) OR the teacher holds one and moves around the circle
  • sharpie per student/small group
  • globe, or map, showing equator and land masses
Procedure

For classes where this activity is not to take up too much time, the teacher can demonstrate by holding the balloon/foam ball and walking around the circle.

Blow up a balloon for each student, only half inflating it, so that it is as round as possible.
Give each student a balloon to represent earth.
Ask students to hold the balloon with the tied neck at the bottom, then to draw on the equator with a sharpie.
Then draw on a rough outline of North America, using a globe or map as a guide. Add a dot for Vancouver.
Keen students can add other places that they know/are from.
(See notes and second photo for using a foam ball on a skewer instead.)

Place the light fixture in the centre of the room, on a desk/chair so that the bulb is near head-height for standing students.
Ask the students to make a circle around the light fixture, large enough so they have good elbow room between them.
Darken the room.

Ask students to point the North Pole of their "earth" balloons towards a high feature in the room e.g. a corner. The designated feature of the room is the "Pole Star" or "North Star". With the North Pole towards the Pole Star, each earth should be tilted, ideally at an angle close to the real tilt of the earth (24 degrees from the vertical).

Ask students to position their earth in front of their bodies so that the "sun" is shining on the earth, while maintaining the tilt towards the Pole Star.
Ask students which is east and west on their earth. If they look at the continent of North America, it should help them.
Ask students to rotate the earth in the correct direction: the sun rises in the east, so the light of the bulb should hit the east coast of North America first. They will be rotating their earths counterclockwise.
For the real earth, each rotation takes one day. As the sun hits our continent it is day time and as we continue to rotate it becomes night time.

Now, we will show what happens during the year, as the Earth orbits the Sun once.
Ask students to walk in a circle around the "sun", always tilting their North Pole towards the Pole Star, while continually rotating their earth counterclockwise (as viewed from above).
Once they have walked completely around the sun and ended up back where they started, a year has passed.
Now walk through another year while asking students to keep an eye on how much sun Vancouver on their Earth receives through the year.
Ask where in the circle does Vancouver get the most time in the sun? (The northern hemisphere will be tilted towards the sun at this position in the circle.) This is the position of midsummer - the summer solstice. Mark this place in the circle with "June" (on the floor, or on the wall behind the circle).
Ask where in the circle does Vancouver get the least sun exposure? (The northern hemisphere will be tipped away from the sun at this position in the circle.)
This is midwinter, or the winter solstice. Mark this position with "December". It should be exactly across the circle from June.

(Optional:
Add that the vernal (spring) and autumnal equinoxes fall between, in March and September.
Students can locate where their birthday month falls in the circle.)

Now ask students to orbit the sun once more, with their tilted, rotating earths, and watch what happens to the north and south poles.
Each of them get sun all day for part of the year.
The sun never sets in Northern Canada in the summer as it is so close to the North Pole.

(Optional:
Discuss seasons in the northern and southern hemispheres, especially if a child in the class is from the southern hemisphere.
In the northern hemisphere, mid summer is in June, whereas in the southern hemisphere, midsummer is in December.)

To review:
In our summer, the northern hemisphere is tilted toward the sun, so has more hours of sunlight through the day (as shown by the above activity). More hours of sun exposure makes it warmer. See this image to review this point: http://www.srh.noaa.gov/srh/jetstream/global/images/seasons.jpg
In addition, the hemisphere that is tilted toward the sun also receives more direct rays of sunlight (or rays that are closer to perpendicular or a 90° angle), which means more intense radiation, so more heat. See this image to show clearly: http://astro.hopkinsschools.org/course_documents/earth_moon/earth/seaso… (backup image: http://web.gccaz.edu/~lnewman/gph111/topic_units/Earth_Sun/01_23.jpg)
The combination of more direct rays of sunlight and more hours of daylight causes the hemisphere that is tilted toward the sun to receive more solar radiation and to have warmer temperatures.

Please note:
A common misconception is that our seasons are caused by the distance from the sun. This is not the case. Our seasons are caused by the the hours of sunlight, and the angle of the sun's rays, as described above.

Notes

A foam ball on a skewer gives a more dramatic light and dark side of the earth, and the stick is good for holding and turning, but much more expensive.

Grades taught
Gr K
Gr 1
Gr 2
Gr 3
Gr 4
Gr 5
Gr 6
Gr 7