Oil spill clean up simulation
- half jam jar of vegetable oil
- 4 Tablespoons cocoa powder
- shallow container of water
- string pieces about 30cm long
- cotton balls
- liquid dish soap, diluted in water
Introduction:
On the BC coast, we hear a lot about oil pipelines and oil tankers. With increased oil tanker traffic in our bays and ocean there is an increased risk of oil spills.
The first activity will look at the effect of an oil spill, and how we attempt to clean it up.
I will give you oil to spill in your ocean. (Show students the simulated oil: cocoa powder mixed into the vegetable oil in the jar.)
Then you will use the materials to clean up as well as we can:
String models the booms that are dragged across the water to stop the oil from spreading and bring it together. Hard if there is wind on water.
Cotton balls are the skimmers that stick the oil to them and pull it out of the water.
Last step, which we will do when you have cleaned up as much as you can, is to add a dispersant (detergent).
Add oil to your ocean.
Your model is 100 billion (11 zeros) times smaller than the oil that was leaked into the Gulf of Mexico. (210 million US gal)
What is happening to the oil? It spreads out. The Gulf of Mexico spill (started in 2010) was a trillion (12 zeros) times larger area than your model. It is restricted in your container - but of course is not in the ocean so spreads further. See the Gulf oil spill at https://en.wikipedia.org/wiki/Deepwater_Horizon_oil_spill#/media/File:D…
Notice that some of your oil sinks - bitumen behaves like this, making it almost impossible to clean up.
Now try clean up:
Loop the string around a patch of oil, to model how booms are spread around an oil spill. Try and contain the oil and pull it to one side of the container. It is somewhat effective, as are booms for real oil spills. Boom image link: https://en.wikipedia.org/wiki/Boom_(containment)#/media/File:Tedx-oil-s…
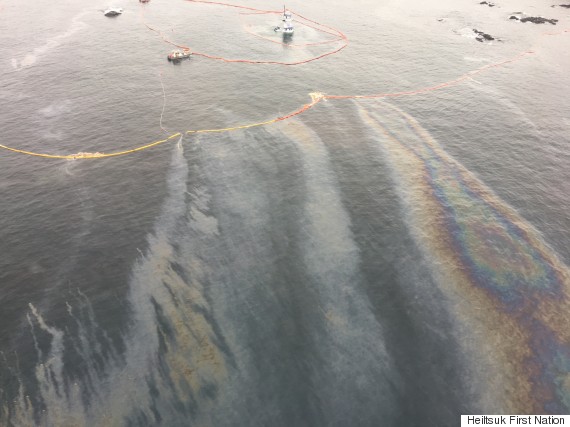
The diesel spill in Bella Bella, BC was hard to contain as the weather was bad. Bella Bella image link: http://i.huffpost.com/gen/4799172/thumbs/o-BELLA-BELLA-OIL-SPILL-570.jp…
Then use the cotton balls to try and soak up the oil. For real oil spills skimmers are used, which similarly soak up oil into absorbent pads. How effective is this in your model? It is hard to be fully effective for a real oil spill. Skimmer image link: https://en.wikipedia.org/wiki/Oil_skimmer#/media/File:Drumskimmer_004.j…
The last step is to add dispersant (or a detergent) to break up the oil droplets and disperse them. Add diluted dish soap to the remaining oil, to observe how it breaks the oil into smaller droplets. 2 million gallons of dispersant were used in the Gulf. Dispersant application image link: https://upload.wikimedia.org/wikipedia/commons/6/61/C-130_support_oil_s… Dispersants break up the oil, but it does not go away. Dispersants themselves are also harmful to wildlife.
#/media/File:Tedx-oil-spill-0075.jpg)
Spilled oil can harm living things in several ways. Oil is a poisonous chemical which animals can be exposed to internally through ingestion or inhalation, or externally on skin and in eyes, causing organ damage and cancer. When oil coats feathers and fur it destroys their ability to keep animals warm. Dispersants reduce the impact of oil on shoreline habitats, but disperse oil into deeper ocean water where it has harmful effects on deep ocean wildlife.